A quick note / tutorial to help anyone trying to find out the same information that I was!
I am looking to set up a CNC system and have chosen to go down the grbl route and use a boarduino. The first hurdle of getting grbl on to the boarduino using the hardware I have on my desk. A lot of sites made this sound a lot harder than it was in the talking about AVR programmers and all sorts
EDIT: The hex file supplied below has an error – the motor drive pin doesn’t work. I have created a new HEX file which I will upload when I have tested it.
I have provided a summary after the jump:
OS – Windows XP, this would probably have been a lot easier with linux!
grbl – I used the hex file from here – https://github.com/downloads/synthetos/grblShield/grbl-latest.hex
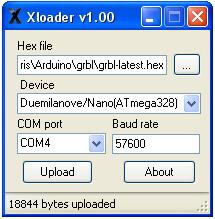
Upload to boarduino – xloader available from – http://russemotto.com/xloader/ (ArduinoUploader didn’t work for me)
Communicate with the board – G-Code sender – https://github.com/OttoHermansson/GcodeSender/downloads
I am assuming that you have your boarduino assembled, tested and are set up to send stuff to it via a usb to serial cable or similair, I use the Arduino USB2Serial Light board (more info on the boarduino – http://www.oomlout.co.uk/index.php?main_page=product_info&products_id=234 or http://www.adafruit.com/products/72).
1) Download everything and unzip the files.
2) Open Xloader
3) Select your hex file
4) Set device to Duemilanove/Nano(ATmega328)
5) Set appropriate COM port
6) Hit upload

7) Open G-Code sender
8) Under serial select appropriate COM port
9) Press open
10) Under command type $ and hit return
11) you should get something similair to the following:

To change a setting, for example to set steps/mm x to 200, type $0=200.
Please be aware that this is untested other than serial communication – I have no idea yet if there are any problems further down the line.
Hopefully this will save someone else from having to trawl the internet for hours with many failed attempts!
Now all I have to do is build some sort of CNC machine to attach it to…